All of our products are shipped exactly as they would arrive to our resellers (music stores or schools).
When you receive your instrument, you will need to (at a minimum) perform the following: 1) Insert the "bridge" into the proper position, 2) Carefully tighten and tune the strings and 3) Floss the bow with Rosin (supplied).
Beginners and novices are encouraged to seek the advice and knowledge from an experienced player and/or service center for assistance, since these sorts of breakage issues are not covered under our guarantee. Even the most seasoned professionals (both players and service technicians) can break strings, bows, etc. Take your time, and be careful!

How to set up the bridge
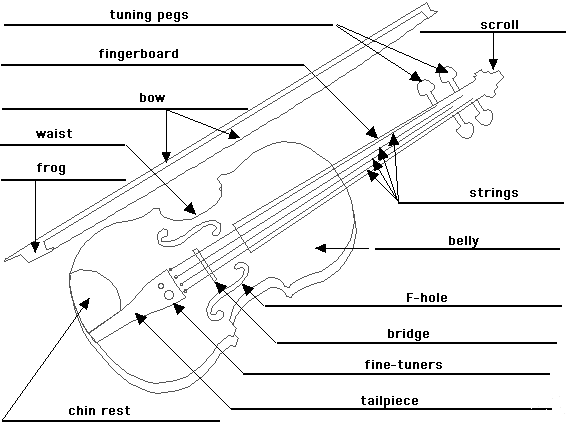
You stand the bridge up across from the little notches in the f holes in the front of the viola. That is about halfway between the tailpiece and end of fingerboard. The shorter end of the bridge goes under the thinnest string.
Loosen the strings up just a little bit so you can just put the whole bridge there under the strings and stand the bridge up. The strings need to be tight enough to hold it upright once you have it up straight and let go of it.
Before you get the strings real tight you can push them side-to-side to get them spaced how you like it. You can even use a knife to put a very shallow notch in the bridge right where you want them to stay.
The strings need to be spaced apart over the bridge, evenly away from each edge, and evenly apart from each other too. Normally they will stay in place just from being tightened to tune correctly but shallow notches or dents help the strings stay in place.
You can pull the Bridge sideways as necessary before the strings are too tight to get the bridge and strings centered over the Fingerboard too.
Strings should be spread evenly across the bridge, and the bridge should be moved side to side so the strings are centered over the fingerboard.
Fine tuners should be screwed in half way so you can tighten or loosen them when you're ready for that step. Screw them in all the way and then back them out halfway.
How to tune your Viola
There are 2 ways to tune a viola: tuning pegs or fine tuners (also called string adjusters). Tuning pegs are used for tuning when the string is at least a half note out of tune while the fine tuners are used when the string is less than a half note out of tune. Fine tuners' tuning range is a lot smaller than the tuning pegs. For more experienced players, you will find that their violas are not equipped with fine tuners on D, G or C strings; only A string is equipped with a fine tuner. This is because A string is the most fragile and requires the most care during tuning.
If 2-4 strings are very out of tune
You need to take extra care while tuning if all 2-4 strings are very out of tune.
If strings are slightly out of tune
You should always follow the instruction above. You may be able to tune the strings with just the fine tuners. However, you should always check to make sure the bridge is still straight after tuning.
You can click on the following icons to listen to the corresponding keys for tuning
![]()
![]()
![]()
![]()
How to take care the bow
Since the bow we sold to you is brand new, you need to apply rosin on the bow. When applied to the bow hair, rosin creates the friction with the string, which in turn generates the sound. You will need to use a knife or sand paper to scrape the top of the rosin in several places so that the powder appears. Then run the bow hair over it until you see the hair getting whiter.
IMPORTANT : Do not over-tighten the bow, after tightening, the bow stick should still be slightly curved. It is vital that the bow be slackened after use. If this is not done, the bow stick will straighten making it impossible to tighten the bow properly and the metal ferrule holding the hair may break as you attempt to tension it more. If the bow has been left tensioned, loosen the adjuster and leave it for a day or two. The stick may then resume its natural shape.